1. ActionBar
First added in Android 3.0(API level 11)

2. Working the Action Bar
2.1 Removing the action bar
ActionBar actionBar = getSupportActionBar();actionBar.hide();
2.2 Using a logo instead of an icon
By default, the system uses your application icon in the action bar,as specified by the icon attribute in the <application>or<activity>
element. However, if you also specify the logo attribute, then the action bar uses the logo image instead of the icon.
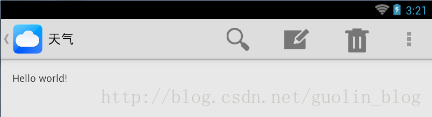
3. Adding Action Items

Action bar with three action buttons and the overflow buton
if the menu items have android:icon and android:title, it be defaluted to show only its icon. android:showAsAction add "withText" property
to show title and icon together
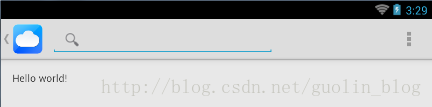
4.Using spilt action Bar
Split action bar provides a separate bar at the bottom of the screen to display all action items when the activity is running on a narrow
screen (such as a portrait-oriented handset).

Mock-ups showing an action bar with tabs(left), then with splite action bar(middle), and with the app icon and title disabled(right)
To enable split action bar when using the support library, you must do two things:
<1> Add uiOptions="splitActionBarWhenNarrow" to each <activity> or <application> element
<2> To support older versions, add a <meta-data> element as a child of each <activity> element that declares the same value
for "android.support.UI_OPTIONS".
5. Navigating Up with the App Icon
Enabling the app icon as an Up button allows the user to navigate your app based on the hierarchical relationships between screens.
For instance, if screen A displays a list of items, and selecting an item leads to screen B, then screen B should include the Up button,
which returns to screen A.
To enable the app icon as an Up button, call setDisplayHomeAsUpEnabled(). For example
@Overrideprotected void onCreate(Bundle savedInstanceState) { super.onCreate(savedInstanceState); setContentView(R.layout.activity_details); ActionBar actionBar = getSupportActionBar(); actionBar.setDisplayHomeAsUpEnabled(true); ...} Now the icon in the action bar appears with the Up caret as shown below

To specify the activity to open when the user presses Up button, you have two options:
<1>Specify the parent activity in the manifest file.
This is the best option when the parent activity is always the same.
By declaring in the manifest which activity is the parent, the action bar automatically performs the correct action when the user
presses the Up button.
... ...
<2>override getSupportParentActivityIntent() and onCreateSupportNavigateUpTaskStack() in the activity
5.1 Back Vs Navigating UP


6. Adding an Action View
An action view is a widget that appears in the action bar as a substitute for an action button.
An action view provides fast access to rich actions without changing activities or fragments, and without replacing the action bar.
For example, if you have an action for Search, you can add an action view to embeds a SearchView widget in the action bar
android:showAsAction="ifRoom|collapseActionView"android:actionViewClass="android.widget.SearchView" //
If you need to configure the action view (such as to add event listeners), you can do so during the onCreateOptionsMenu()
@Overridepublic boolean onCreateOptionsMenu(Menu menu) { getMenuInflater().inflate(R.menu.main_activity_actions, menu); MenuItem searchItem = menu.findItem(R.id.action_search); SearchView searchView = (SearchView) MenuItemCompat.getActionView(searchItem); // Configure the search info and add any event listeners ... return super.onCreateOptionsMenu(menu);} 6.1 Handling collapsible action views
@Overridepublic boolean onCreateOptionsMenu(Menu menu) { getMenuInflater().inflate(R.menu.options, menu); MenuItem menuItem = menu.findItem(R.id.actionItem); ... // When using the support library, the setOnActionExpandListener() method is // static and accepts the MenuItem object as an argument MenuItemCompat.setOnActionExpandListener(menuItem, new OnActionExpandListener() { @Override public boolean onMenuItemActionCollapse(MenuItem item) { // Do something when collapsed return true; // Return true to collapse action view } @Override public boolean onMenuItemActionExpand(MenuItem item) { // Do something when expanded return true; // Return true to expand action view } });}
7. Adding an Action Provider
7.1 Using the ShareActionProvider
private ShareActionProvider mShareActionProvider;@Overridepublic boolean onCreateOptionsMenu(Menu menu) { getMenuInflater().inflate(R.menu.main_activity_actions, menu); // Set up ShareActionProvider's default share intent MenuItem shareItem = menu.findItem(R.id.action_share); mShareActionProvider = (ShareActionProvider) shareItem.getActionProvider(); mShareActionProvider.setShareIntent(getDefaultIntent()); return super.onCreateOptionsMenu(menu);}/** Defines a default (dummy) share intent to initialize the action provider. * However, as soon as the actual content to be used in the intent * is known or changes, you must update the share intent by again calling * mShareActionProvider.setShareIntent() */private Intent getDefaultIntent() { Intent intent = new Intent(Intent.ACTION_SEND); intent.setType("image/*"); return intent;} <2>
8. Adding Navigation Tabs
![]()
To get started, layout must include a ViewGroup in which ypu place each Fragment associated with a tab.
if the tab content will fill the activity layout, the resource ID of the ViewGroup is android.R.id.content. otherwise, create a ID by hand
then:
<1>Implement Actionbar.TabListener interface. This interface providers callbacks for tab events
<2>setTabListener() setText() setIcon()
<3>add each tab to the action bar by calling addTab().
public class MytabListener implements TabListener{ private Fragment fragment; private final Activity mActivity; private final String mTag; private final Class mClass; //@param activity The host Activity, used to instantiate the fragment //@param tag The identifier tag for the fragment //@param clz The fragment's Class, used to instantiate the fragment public MytabListener(Activity activity, String tag, Class clz){ this.mActivity = activity; this.mTag = tag; this.mClass = clz; } @Override public void onTabSelected(Tab tab, FragmentTransaction ft) { if(fragment == null){ // If not initialized before, instantiate and add it to the activity fragment = Fragment.instantiate(mActivity, mClass.getName()); ft.add(android.R.id.content,fragment,mTag); } else{ //Log.d("d",fragment.getClass().getName()); could get the name of fragment ft.attach(fragment); } } @Override public void onTabUnselected(Tab tab, FragmentTransaction ft) { if (fragment != null) { // Detach the fragment, because another one is being attached ft.detach(fragment); } } @Override public void onTabReselected(Tab tab, FragmentTransaction ft) { } } The listener simply attaches a fragment to the activity layout, or if not instantiated, creates the fragment and adds it to the layout(as
a child of the android.R.id.content view group). When the respective tab is selected, and detaches it when the tab is unselected.
All that remains is to create each ActionBar.Tab and add it to the ActionBar.
Addidtionally, must call setNavigationMode(NAVIGATION_MODE_TABS) to make the tabs visible
@Overrideprotected void onCreate(Bundle savedInstanceState) { super.onCreate(savedInstanceState); // Notice that setContentView() is not used, because we use the root // android.R.id.content as the container for each fragment // setup action bar for tabs ActionBar actionBar = getSupportActionBar(); actionBar.setNavigationMode(ActionBar.NAVIGATION_MODE_TABS); actionBar.setDisplayShowTitleEnabled(false); Tab tab = actionBar.newTab() .setText(R.string.artist) .setTabListener(new TabListener ( this, "artist", ArtistFragment.class)); actionBar.addTab(tab); tab = actionBar.newTab() .setText(R.string.album) .setTabListener(new TabListener ( this, "album", AlbumFragment.class)); actionBar.addTab(tab);}
9. Adding Drop-down Navigation

<1>create a SpinnerAdapter
<2>implement ActionBar.OnNavigationListener
<3>onCreate method--> setNavigationMode(NAVIGATION_MODE_LIST)
<4>set the callback for drop-down list
10. Finally
a Menu project using all features above :